OPNFV Euphrates install(二)

1 前言

本文详细介绍使用OPNFV 的 Fuel部署工具部署Euphrates版本。OPNFV社区从E版本开始全面采用XCI跨社区集成[1]方式,能够最快的获取并集成上游社区项目的最新代码同时可以减少等待BUG修复的时间,2017年10月Euphrates版本首发时还是基于Openstak的Ocata版本,而Ocata是在2017年2月份发布,但是到2017年8月底最新的Pike版本也发布了,由于OPNFV的版本发布周期与Openstack版本的发布周期不一致,也就意味着OPNFV的新版本永远是基于Openstack的上一个版本,OPNFV社区的测试项目将会一直滞后于Openstack的版本,在OPNFV社区引入XCI后我们看到在17年的11月份OPNFV已经支持Pike版本的虚拟POD安装。

OPNFV XCI

在Danube版本时Fuel还是可视化的界面安装对于新接触OPNFV的新手或多或少还能慢慢学习研究。但是E版本的Fuel完全使用脚本命令的方式,无疑是加大了新手的入门难度以及学习难度,在研究Fuel的安装过程中遇到了许多坑也确实也学到了许多东西。

2 安装环境准备

社区在Fuel的安装指导[2]里介绍了如何使用Fuel安装Euphrates,但是这里不得不吐槽一下写这个wiki的人肯定认为阅读文档的人跟他一样是大神,文档写的太简单了,即使是一个环境配置的PDF(pod describe file)如果没有一定了解也是无从下手。

官方推荐的jumphost系统版本为 Ubuntu Xenial或 CentOS 7,本文采用的ubuntu 16.04 64b server版本,若采用CentOS软件安装的命令及版本名会稍有不同请自行搜索解决。

Fuel安装代码仓库:https://git.opnfv.org/fuel

Note:部署时一定要选用最新的stable/euphrates稳定分支代码,该分支会持续修改部分部署BUG。

2.1 POD配置文件-PDF

官方给的参考POD文件是Fuel仓库里的LF(Linux Foundation)的pod1在fuel/mcp/config/labs/local目录下,接下来笔者以自己部署的baremetal POD来讲解PDF的内容。PDF采用Yaml格式,包含两部分文件,一部分是IDF用来描述部署工具节点也叫jumphost(这个地方的理解错误导致我出现了文末的部署问题2)节点的网络描述,内容相对简单,需要注意的是网卡名应与节点的网卡名称一致,一般是enoX或enpXs0,如果使用了DPDK则需要正确填写busaddr信息;另一部分是描述整个OPNFV各节点的详细网络、硬件资源等配置信息内容相对多。不熟悉Yaml格式的可以先预习一下Yaml格式:http://www.ruanyifeng.com/blog/2016/07/yaml.html

本次安装的PDF文件下载链接为:idf-pod1.yamlpod1.yaml

fuel/mcp/config/labs/bii/idf-pod1.yaml的内容如下,网桥的配置与后续安装执行的命令相关,网桥名字可以任取但是需要与安装时的命令参数保持一致。

1
2
3
4
5
6
7
8
9
10
11
12
13
14
15
16
17
18
19
20
21
22
23
24
25
26
27
28
29
30
31
32
33
34
35
36
37
38
39
40
41
42
##############################################################################
# Copyright (c) 2017 BII-CFIEC, Mirantis Inc., Enea AB and others.
# All rights reserved. This program and the accompanying materials
# are made available under the terms of the Apache License, Version 2.0
# which accompanies this distribution, and is available at
# http://www.apache.org/licenses/LICENSE-2.0
##############################################################################
---
### BII POD 1 installer descriptor file ###

idf:
version: 0.1
fuel:
jumphost:
bridges:
admin: 'br-pxe'
mgmt: 'br-ctl'
private: ''
public: ''
network:
node:
# Ordered-list, index should be in sync with node index in PDF
- interfaces: &interfaces
# Ordered-list, index should be in sync with interface index in PDF
- 'eno1'
- 'eno2'
- 'eno3'
- 'eno4'
busaddr: &busaddr
# Bus-info reported by `ethtool -i ethX`
- '0000:01:00.0'
- '0000:01:00.1'
- '0000:02:00.0'
- '0000:02:00.1'
- interfaces: *interfaces
busaddr: *busaddr
- interfaces: *interfaces
busaddr: *busaddr
- interfaces: *interfaces
busaddr: *busaddr
- interfaces: *interfaces
busaddr: *busaddr

fuel/mcp/config/labs/bii/pod1.yaml的内容如下,detail部分的描述属于非必填内容,net_config中的内容为各节点的描述信息,非常重要。可以配合拓扑图一起查看,部分配置的可选参数参考官方的示例文件

  • oob指的的服务器的电源管理IP地址,Fuel安装过程中使用了Maas服务需要通过该地址去对服务器进行裸机管理,包括重启、开关机管理的,Maas是ubuntu社区开发的裸机管理工具支持IPMI、虚拟机管理等,有兴趣的可以研究一下。这里也提一点这是NFV架构中针对PIM(Physical Infrastructure Management)物理基础设施的管理与Openstack的VIM(Virtual Infrastructure Management)虚拟设施管理相对。本次安装的服务器使用的是IPMI的2.0版本,这里有一个坑①是注意查看服务器的IPMI LAN 是否启用,对于DELL服务器在iDRAC config->networking->IPMI config,如果未开启安装时将会出现mas01节点无法连接其他节点(Ps. 这个坑我爬了三天才发现);

  • interface参数指的的该段网络使用的是哪个网卡,与idf-pod1.yaml中的interfaces网卡顺序以及busaddr严格匹配,但是oob的interface不受此参数控制;

  • vlan标记该网络是否有vlan tag,如果没有则用’native’标记;

  • remote_params是前面提到的IPMI管理,填入相应的IP、用户名、密码、mac地址,实际安装中该项的mac地址并没有使用到,该项的另一个参数是AMT,是英特尔的远端管理方式;

  • 网卡特征中支持的参数是sriov和dpdk,笔者使用的服务器较老因此没有这些特性就选择空着;

    剩下的一些服务器类型相关的信息,依据实际的服务器参数填写即可。需要指明的是节点的角色并不是按照配置文件中的命名来的,是按照节点的顺序来分配的依次是kvm0103,cmp0102,同时目前的安装方式对于节点的IP都是在指定的CIDR内随机分配的参看脚本pod_config.yml.j2

1
2
3
4
5
6
7
8
9
10
11
12
13
14
15
16
17
18
19
20
21
22
23
24
25
26
27
28
29
30
31
32
33
34
35
36
37
38
39
40
41
42
43
44
45
46
47
48
49
50
51
52
53
54
55
56
57
58
59
60
61
62
63
64
65
66
67
68
69
70
71
72
73
74
75
76
77
78
79
80
81
82
83
84
85
86
87
88
89
90
91
92
93
94
95
96
97
98
99
100
101
102
103
104
105
106
107
108
109
110
111
112
113
114
115
116
117
118
119
120
121
122
123
124
125
126
127
128
129
130
131
132
133
134
135
136
137
138
139
140
141
142
143
144
145
146
147
148
149
150
151
152
153
154
155
156
157
158
159
160
161
162
163
164
165
166
167
168
169
170
171
172
173
174
175
176
177
178
179
180
181
182
183
184
185
186
187
188
189
190
191
192
193
194
195
196
197
198
199
200
201
202
203
204
205
206
207
208
209
210
211
212
213
214
215
216
217
218
219
220
221
222
223
224
225
226
227
228
229
230
231
232
233
234
235
---
### This is a BII POD1 descriptor file ###

details:
pod owner: ylong
contact: ylong@biigroup.cn, zjtang@biigroup.cn
lab: BII Pharos LAB
location: BDA, Beijing, China
type: development
link: https://wiki.opnfv.org/display/pharos/BII
###################################################
net_config:
oob: # IPMI management network
interface: 0
ip-range: 192.168.20.201-192.168.20.205
vlan: native
admin:
interface: 0
vlan: native
network: 10.20.0.0
mask: 24
mgmt:
interface: 2
vlan: 101
network: 192.168.101.0
mask: 24
private:
interface: 3
vlan: 102
network: 192.168.102.0
mask: 24
# storage:
# interface: 3
# vlan: 103
# network: 192.168.103.0
# mask: 24
public:
interface: 1
vlan: native
network: 192.168.20.0
mask: 24
gateway: 192.168.20.1
dns:
- 114.114.114.114
- 8.8.8.8
###################################################
jumphost:
name: fuel
node:
type: baremetal # can be virtual or baremetal
vendor: Dell Inc.
model: powerEdge 720
arch: x86_64
cpus: 2
cpu_cflags: hasewell # add values based on CFLAGS in GCC
cores: 4 # physical cores, not including hyper-threads
memory: 16G
disks: # disk list
- name: 'disk1' # first disk
disk_capacity: 1100G # volume
disk_type: hdd # several disk types possible
disk_interface: sas # several interface types possible
disk_rotation: 15000 # define rotation speed of disk
os: ubuntu-16.04 #operation system installed
remote_params: &remote_params
type: ipmi
versions:
- 2.0
user: root
pass: *****
remote_management:
<<: *remote_params
address: 192.168.20.200
mac_address: "44:A8:42:1A:68:78"
interfaces: # physical interface list
- mac_address: "44:a8:42:15:10:03"
speed: 1gb
features: ''
- mac_address: "44:a8:42:15:10:04"
speed: 1gb
features: ''
- mac_address: "44:a8:42:15:10:05"
speed: 1gb
features: ''
- mac_address: "44:a8:42:15:10:06"
speed: 1gb
features: ''
fixed_ips:
admin: 10.10.0.2
mgmt: 192.168.101.2
public: 192.168.20.235
###################################################
nodes:
- name: controller1
node: &nodeparas
type: baremetal
vendor: Dell Inc.
model: powerEdge 720
arch: x86_64
cpus: 2
cpu_cflags: hasewell # add values based on CFLAGS in GCC
cores: 4 # physical cores, not including hyper-threads
memory: 32G
disks: &disks_A # disk list
- name: 'disk1' # first disk
disk_capacity: 128G # volume
disk_type: ssd # several disk types possible
disk_interface: sas # several interface types possible
disk_rotation: 15000 # define rotation speed of disk
- name: 'disk2' # second disk
disk_capacity: 2400G
disk_type: hdd
disk_interface: sas
disk_rotation: 15000
remote_management:
<<: *remote_params
address: 192.168.20.203
mac_address: "44:A8:42:1A:49:A5"
interfaces:
- mac_address: "44:a8:42:14:cd:0d"
speed: 1gb
features: ''
- mac_address: "44:a8:42:14:cd:0e"
speed: 1gb
feature: ''
- mac_address: "44:a8:42:14:cd:0f"
speed: 1gb
feature: ''
- mac_address: "44:a8:42:14:cd:10"
speed: 1gb
feature: ''
fixed_ips:
admin: 10.20.0.16
mgmt: 192.168.101.16
public: 192.168.20.16
########################################
- name: controller2
node: *nodeparas
disks: *disks_A
remote_management:
<<: *remote_params
address: 192.168.20.204
mac_address: "44:A8:42:1A:76:2C"
interfaces:
- mac_address: "44:a8:42:15:1b:e6"
speed: 1gb
features: ''
- mac_address: "44:a8:42:15:1b:e7"
speed: 1gb
feature: ''
- mac_address: "44:a8:42:15:1b:e8"
speed: 1gb
feature: ''
- mac_address: "44:a8:42:15:1b:e9"
speed: 1gb
feature: ''
fixed_ips:
admin: 10.20.0.17
mgmt: 192.168.101.17
public: 192.168.20.17
########################################
- name: controller3
node: *nodeparas
disks: *disks_A
remote_management:
<<: *remote_params
address: 192.168.20.205
mac_address: "44:A8:42:13:D5:1B"
interfaces:
- mac_address: "44:a8:42:14:fc:1a"
speed: 1gb
features: ''
- mac_address: "44:a8:42:14:fc:1b"
speed: 1gb
feature: ''
- mac_address: "44:a8:42:14:fc:1c"
speed: 1gb
feature: ''
- mac_address: "44:a8:42:14:fc:1d"
speed: 1gb
feature: ''
fixed_ips:
admin: 10.20.0.18
mgmt: 192.168.101.18
public: 192.168.20.18
########################################
- name: compute1
node: *nodeparas
disks: *disks_A
remote_management:
<<: *remote_params
address: 192.168.20.201
mac_address: "44:A8:42:1A:70:BE"
interfaces: # physical interface list
- mac_address: "44:a8:42:14:ee:64"
speed: 1gb
features: ''
- mac_address: "44:a8:42:14:ee:65"
speed: 1gb
features: ''
- mac_address: "44:a8:42:14:ee:66"
speed: 1gb
features: ''
- mac_address: "44:a8:42:14:ee:67"
speed: 1gb
features: ''
fixed_ips:
admin: 10.10.0.14
mgmt: 192.168.101.14
public: 192.168.20.14
########################################
- name: compute2
node: *nodeparas
disks: *disks_A
remote_management:
<<: *remote_params
address: 192.168.20.202
mac_address: "44:A8:42:1A:76:26"
interfaces:
- mac_address: "44:a8:42:14:cb:31"
speed: 1gb
features: ''
- mac_address: "44:a8:42:14:cb:32"
speed: 1gb
features: ''
- mac_address: "44:a8:42:14:cb:33"
speed: 1gb
features: ''
- mac_address: "44:a8:42:14:cb:34"
speed: 1gb
features: ''
fixed_ips:
admin: 10.20.0.15
mgmt: 192.168.101.15
public: 192.168.20.15

坑①:如下图所示:

IPMI设置

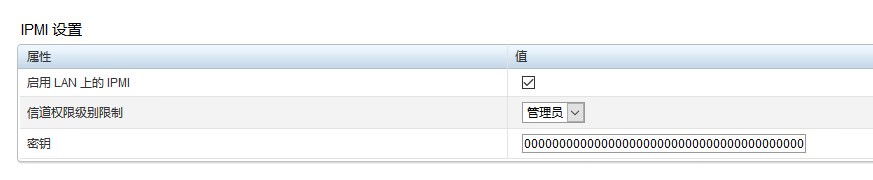
需要开启IPMI的LAN,另外还有一点关于密钥的,我的某一台服务器的不是0000000000000000000000000000000000000000,出现过maas无法连接节点的情况。

本次安装的拓扑图如下

topo

2.2 安装过程

2.2.1 网桥配置

配置jumphost的网桥保证运行其上的虚拟机与其它物理节点的联通,必要的网桥是pxe和ctl,public的网桥可以不用设置,脚本会主动添加nat转换。可以直接在/etc/network/interfaces中配置网桥

1
2
3
4
5
6
7
8
9
10
11
12
13
14
15
16
17
18
19
20
21
22
23
24
25
26
27
28
29
30
31
32
33
34
35
36
37
38
39
40
41
# This file describes the network interfaces available on your system
# and how to activate them. For more information, see interfaces(5).

source /etc/network/interfaces.d/*

# The loopback network interface
auto lo
iface lo inet loopback

auto eth0
iface eth0 inet manual

# The primary network interface
auto eth1
iface eth1 inet static
address 192.168.20.5
netmask 255.255.255.0
network 192.168.20.0
broadcast 192.168.20.255
gateway 192.168.20.1
# dns-* options are implemented by the resolvconf package, if installed
dns-nameservers 114.114.114.114
iface eth1 inet6 auto

auto eth2
iface eth2 inet manual

#auto eth3
#iface eth3 inet manual

auto br-pxe
iface br-pxe inet static
address 10.20.0.1
netmask 255.255.255.0
bridge_ports eth0
bridge_fd 0

auto br-ctl
iface br-ctl inet manual
bridge_ports eth2
bridge_fd 0

网桥拓扑如下

1
2
3
bridge name	bridge id		 STP enabled	interfaces
br-ctl 8000.000c2948cc74 no eth2
br-pxe 8000.000c2948cc60 no eth0

PS:之前采用过在EXSI虚拟机之上安装ubuntu16.04作为jumphost然后进行部署,部署过程中出现过mas01的dhcp应答node节点无法收到的情况导致安装一直不成功,最后不得使用裸机安装ubuntu16.04然后在进行部署(这个坑爬了一个星期,因为一直怀疑是自己的网桥配置错误),这里并不确认是否在虚拟机上一定无法部署成功只是写出来留意一下。

2.2.2 运行部署脚本

将准备好的PDF文件放置在opnfv/fuel/mcp/config下的目录中,安装脚本会自动查找相应PDF文件,可以使用ci/deploy.sh -h命令来查看个参数的含义,上一篇文章也讲解了各参数的含义。

1
2
sudo ci/deploy.sh -D -b file:///home/opnfv/fuel/mcp/config/ \
-l bii -p pod1 -s os-odl-nofeature-ha -B br-pxe,br-ctl

部署策略的配置在mcp/config/scenario/baremetal目录中查看,默认分配给安装时的虚拟机cfg01和mas01的资源是4核、6G内存,若jumphost的资源较足可以适当扩大安装虚拟机分配的资源。Fuel的安装过程中会调用fuel/mcp/scripts下的相关脚本完成具体的安装任务,其中lisb.sh负责相关的网络配置等,globals.sh是一个全局变量配置文件,由于之前使用Danube版本的fuel安装时习惯了将openstack各节点的管理IP分配到10.20.0.0/24段因此为了避免与Fuel安装过程中的虚拟机冲突这里修改了默认的mcpcontrol虚拟机网络段。

安装过程中jumphost的cfg01(10.0.0.2)是用来下发安装时的相关配置的以及同步文件,mas01(10.0.0.3)是用来进行裸机管理的。使用命令

1
ssh -o StrictHostKeyChecking=no -o UserKnownHostsFile=/dev/null -i /var/lib/opnfv/mcp.rsa ubuntu@10.0.0.3

可以查看安装过程的状态,尤其是mas01的裸机管理,如果相应的配置没有设置好需要在这里排错,在mas01的/var/lib/maas目录下(若无该目录说明Maas服务未安装,需要等待一段时间),当Maas服务安装后可以使用tail -f /var/log/maas/maas.log查看各节点的安装状态,同时可以登录Maas的web界面查看各节点的状态。登录方式有两种

1) jumphost中做NAT转发

关于nat转发不熟悉的可以查看这篇博客,博客中关于ipatables讲解十分详细。本文中192.168.20.5为jumphost的public IP,既可以访问外网也可以与局域网其他主机访问,10.20.0.1/24为jumphost 部署OPNFV环境的PXE网桥地址,仅限OPNFV环境的各节点访问。

1
2
3
iptables -t nat -A PREROUTING -d 192.168.20.5 -p tcp --dport 80 -j DNAT --to 10.20.0.3:80
iptables -A FORWARD -d 10.20.0.3 -p tcp --dport 80 -j ACCEPT
iptables -t nat -A POSTROUTING -d 10.20.0.3 -p tcp --dport 80 -j SNAT --to 10.20.0.1

在本机上访问http://192.168.20.5:8000/MAAS

账号/密码:opnfv/opnfv_secret,即可查看。

2) 终端开启隧道

该方式如上一篇虚拟安装中讲解到,添加一个本机的80端口到mas01的80端口映射即可。访问本机的http://localhost/MAAS/

Maas端口映射

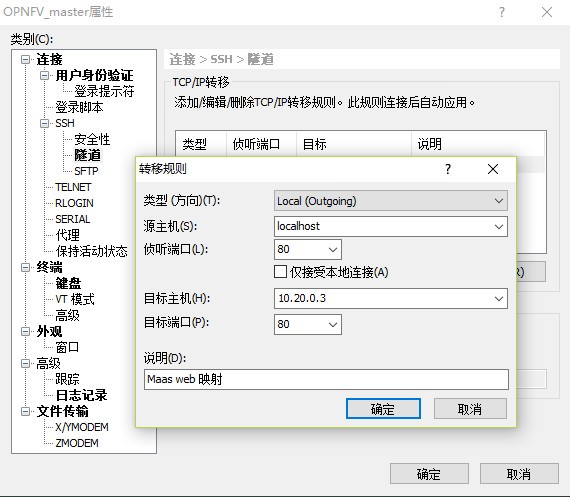
MAAS的dashboard会显示安装过程以及各节点的信息。

安装过程

2.2.3 修改虚拟机登录密码

1)简单的修改密码

部署过程中生成的虚拟机只能使用ssh+key的方式登录,因此需要修改一下密码方便后续的登录,使用下面的命令修改密码

1
2
3
4
ssh -o StrictHostKeyChecking=no -o UserKnownHostsFile=/dev/null -i /var/lib/opnfv/mcp.rsa ubuntu@10.0.0.3 "sudo passwd root<<EOF
r00tme
r00tme
EOF"

2)修改密码和运行ssh密码登录

登录脚本准备cat node_init.sh

1
2
3
4
5
6
7
8
9
10
11
12
13
14
15
16
17
18
19
20
21
22
23
24
25
26
27
28
29
30
31
32
33
34
35
36
37
38
39
40
41
42
43
44
45
46
47
48
49
50
51
52
53
54
55
56
57
58
59
60
61
62
63
64
65
66
67
68
69
#########################################################################
# File Name: ubuntu_init_conf.sh
# Author: louie.long
# Mail: ylong@biigroup.cn
# Created Time: Thu 26 Oct 2017 11:09:05 AM CST
# Description: 这个脚本用于修改新建ubuntu系统的配置,
# 包括:root密码(r00tme),允许ssh密码登录
#########################################################################
#!/bin/sh -e

sudo su

########################################################################
## Begin of check file exist and backup file
#
check_file_and_backup() {
if [ ! -f "$1" ]; then
echo "$1 is not exist"
return 0
else
cp $1 $1-backup`date +%y%m%d_%H%M`
return 1
fi
}
#
## End of check file exist and backup file
########################################################################

########################################################################
## Begin of modify ssh config
#
modify_ssh_conf() {
check_file_and_backup /etc/ssh/sshd_config
ret=$?
if [ $ret -eq 1 ]; then
sed -i 's/^.*PermitRootLogin.*$/PermitRootLogin yes/g' \
/etc/ssh/sshd_config
sed -i 's/^.*PasswordAuthentication.*$/PasswordAuthentication yes/g' \
/etc/ssh/sshd_config
service ssh restart
fi
}
#
## End of modify ssh config
########################################################################

########################################################################
## Begin of change root passwd to 'r00tme'
#
change_root_passwd()
{
passwd root<<EOF
r00tme
r00tme
EOF
}
#
## End of change root passwd to 'r00tme'
########################################################################

########################################################################
## Begin of main
#
#set -x
modify_ssh_conf
change_root_passwd
#
## End of main
########################################################################

然后运行以下命令后,即可直接使用密码进行ssh登录

1
ssh -o StrictHostKeyChecking=no -o UserKnownHostsFile=/dev/null -i /var/lib/opnfv/mcp.rsa ubuntu@10.0.0.2 < node_init.sh

各虚拟机的IP可以在fuel/mcp/deploy/images/pod_config.yml中查看或在任意虚拟机的/etc/hosts中查看,登陆http://:8090页面也可查看各节点及相关服务的信息,Proxy vip与openstack的dashboard访问IP一致。

2.3 部署中出现的问题

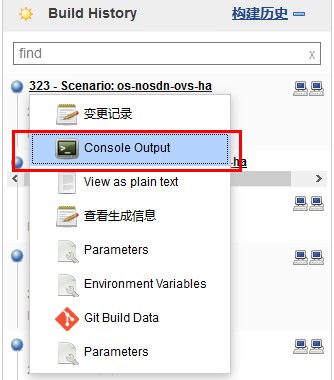
部署过程中如果发现不太正常的情况可以对比一下OPNFV官方Jeklins的构建历史日志,便于确认问题所在。

1)部署超时

如果部署过程中在maas.log中出现部署超时如下所示,可能是软件安装未完成或者其他安装操作耗时超过设置的15分钟

1
Dec 13 09:27:00 mas01 maas.node: [error] kvm01: Marking node failed: Node operation 'Deploying' timed out after 15 minutes.

可以修改mcp/patches/0010-maas-region-allow-timeout-override.patch文件第46行适当延长deploy时间,如果延长时间仍然有问题这需要依据maas.log再次排查错误了。

2018年1月20日更新:官方已经将此处的部署时间做了适当延长,git show f25c19f7a3f90查看。

2)节点网卡名配置

2017年12月21日更新

部署过程中脚本提示如下信息,经过对比官方的构建历史日志,如下信息输出是正常的,但是等待时间太长,就可能出现问题。

1
2
3
4
5
6
cmp002.baremetal-mcp-ocata-odl-ha.local:
Minion did not return. [Not connected]
.kvm01.baremetal-mcp-ocata-odl-ha.local:
Minion did not return. [Not connected]
kvm03.baremetal-mcp-ocata-odl-ha.local:
Minion did not return. [Not connected]

登录到相应节点(需要注意的是节点的登录与mas01的登录一样是使用密钥登录的,不能通过密码直接登录,因此需要在节点安装系统时就尝试登录进去修改密码,否则一旦出现上述错误可能没法通过ssh登录只能在终端输入用户密码登录,此时还可以通过在cfg01节点上用salt-stack的命令来查看各节点信息,如salt -C "ctl* or cmp*" cmd.run "ifconfig -a")查看网卡信息,本次出现的问题是节点在自动配置网络后没有PXE/admin的IP,打开/etc/network/interfaces发现其配置的网卡名为ethX而节点的网卡名为enoX,因此需要修改部署PDF中idf-pod1.yaml中的网卡名称,

3)openstack的dashboard无法访问

部署完成后再访问dashboard时出现无法访问的情况,查找了一下发现是代理虚拟机prx不正常,尝试ssh登录prx,无法访问(原因是代理虚拟机内没有传入密钥)。登录到相应的控制节点上使用virsh list查看虚拟机名称,尝试通过virsh reboot prx02.baremetal-mcp-ocata-odl-ha.local后发现可以访问dashboard。至于prx的访问可以使用virsh console prx02.baremetal-mcp-ocata-odl-ha.local免密访问。

安装完成就可以愉快的玩耍了,初次安装会有一些麻烦,一旦安装完成后续的重新部署就会简单许多。

返回文首

参考文献:

1)OPNFV XCI 介绍

2)Fuel install guide

-------------本文结束感谢您的阅读-------------

版权声明

Louie's Blog by louie long is licensed under a Creative Commons BY-NC-ND 4.0 International License.
Louie Long创作并维护的Louie's Blog博客采用创作共用保留署名-非商业-禁止演绎4.0国际许可证
本文首发于Louie's Blog 博客( http://ylong.net.cn ),版权所有,侵权必究。
转载请注明作者和链接地址http://ylong.net.cn, 如对文章内容有疑问请联系邮箱( longyu805@163.com )。