1 前言
使用Hexo一年多了,页面样式主题都是好久之前的一直没有更改过。闲来想换换新货,体验下新的代码,同时加入一些羡慕已久的页面特效,本文记录一下升级的过程。以一个新建立的blog开始记录,至于Hexo的安装则跳过了。
2 初始blog
为了记录自定义的修改这里预先建立的一个blog的git仓库,方便记录修改的地方。
使用Hexo命令建立一个初始blog,随后加入到仓库中。
1 | louie@ubuntu:~/workplace$ hexo init blog |
下载主题,这里使用next主题,使用v6.1.0的版本方便后续升级也便于记录修改起始的版本。
![]()
1 | louie@ubuntu:~/workplace/blog/themes$ git clone --branch v6.1.0 https://github.com/theme-next/hexo-theme-next.git next |
Next 主题官网更新后给出了一波自定义教程,总结的非常全面,可以直接参考官方的配置:传送门
3 配置、美化blog
3.1 配置_config.yml
修改默认主题
1 | # Site |
设置网站图标,在souce目录下创建一个uploads目录(因为next搜索指定了目录路径),将图片等都放置在这个目录同一管理。修改next主题的配置文件themes/next/_config.yml,avatar为图像图片,favicon为网站icon图片 ,推荐一个好用的ico 制作网站。apple和safari的像素要高许多可以参考原主题ico大小。
favicon:
small: /uploads/favicon-16x16.ico
medium: /uploads/favicon-32x32.ico
apple_touch_icon: /uploads/favicon-48x48.ico
safari_pinned_tab: /uploads/favicon-48x48.icoavatar: /uploads/shadian.png
blog首页底部的版权信息,直接修改themes/next/_config.yml的footer内容
1 | footer: |
根据需求自行修改,英文也很简单易懂^-^。
3.2 创建标签等页面
创建标签、关于、分类、归档等页面,只需要调用hexo的命令在blog/source目录下生成指定的目录文件即可
1 | hexo new page "tags" |
随后即会在source目录下生成相应的目录及文件,修改对应的文件如about/index.md,将comments设为false,禁止在该页面进行评论。
1 | cat categories/index.md |
设置完成后可以通过hexo g和hexo s进行效果查看,这里不再赘述了。同时需要在主题中打开相应的开关themes/next/_config.yml
about: /about/ || user
tags: /tags/ || tags
categories: /categories/ || th
archives: /archives/ || archive
commonweal: /404/ || heartbeat
3.3 设置首页文章显示篇数
安装相关插件,可以看到package.json中的信息有修改,显示新加入的插件
1 | npm install --save hexo-generator-index |
修改全局配置文件blog/_config.yml,增加以下内容
index_generator:
per_page: 10archive_generator:
per_page: 20
yearly: true
monthly: truetag_generator:
per_page: 10
其中per_page字段是期望每页显示的篇数。index, archive及tag开头分表代表主页,归档页面和标签页面。
3.3 增加字数统计功能
Next主题集成了Word Count 功能,首先安装插件
1 | npm install hexo-symbols-count-time --save |
插件主要功能:
- 字数统计:WordCount
- 阅读时长预计:Min2Read
安装完插件后仅需要修改根配置文件blog/_config.yml即可
symbols_count_time:
symbols: true
time: true
total_symbols: true
total_time: true
3.4 增加站内搜索功能
Next主题支持Google、Algolia、Swiftype三种搜索,这里选用Algolia搜索。设置方式也很多,随便搜一下就可以找到。首先需要到Algolia官网进行注册,然后获得API Key填入根配置文件中。
参考Algolia GitHub链接,安装algolia插件
1 | npm install --save hexo-algolia |
在blog/_config.yml配置文件添加如下信息
algolia:
applicationID: ‘Application ID’
apiKey: ‘Search-only API key’
indexName: ‘indexName’
chunkSize: 5000
将Application ID、Search-only API key以及indexName都替换成自己的信息。同时需要将next主题中algolia搜索开关打开
algolia_search:
enable: true
执行下述命令
1 | export HEXO_ALGOLIA_INDEXING_KEY=Search-Only API key # Use Git Bash |
3.5 添加首页文章以摘要显示
开启主题的摘要功能,length表示显示摘要的截取字符串长度。
auto_excerpt:
enable: true
length: 150
3.6 添加统计
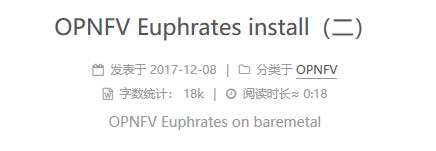
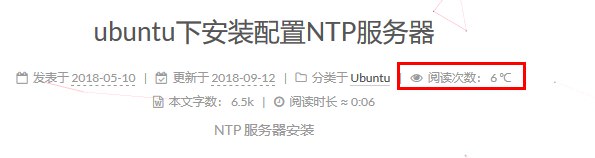
3.6.1 文章阅读统计及热度
如图所示的效果,看起来很酷炫
参考leanclond next配置指南,首先安装leanclound插件
1 | npm install hexo-leancloud-counter-security --save |
这里需要用到leancloud,注册及配置查考链接:传送门,首先注册账号,经过注册创建应用等过程后拿到key填入到next主题中
leancloud_visitors:
enable: true
app_id: M8d5yPXQ5l0kwFz1bO6cF***
app_key: QEarlHm5c8XcuF22*****
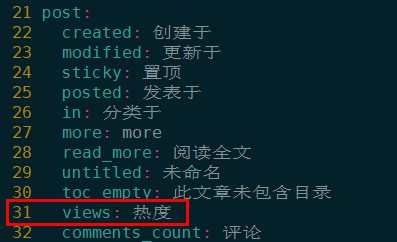
将统计结果修改为热度,修改themes/next/languages/zh-CN.yml文件中post段中view中文翻译为热度。
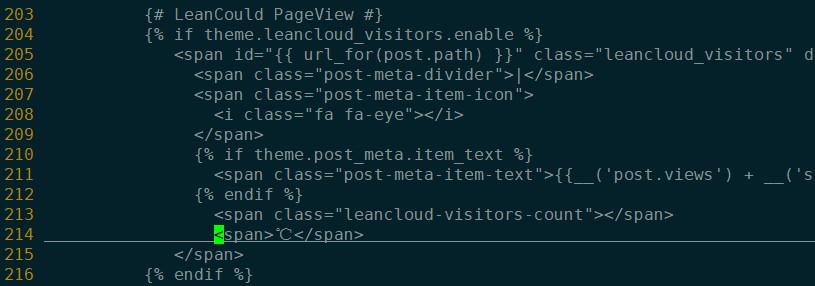
打开themes/next/layout/_macro/post.swig搜索leancloud-visitors-count字段,添加<span>sheshid</span>
后续还有一些关于Leanclound的设置,为节省篇幅,请直接访问:传送门
3.6.2 添加全站访问量统计
全站访客统计使用不蒜子,在themes/next/layout/_partials/footer.swig中添加如下内容。
1 | <script async src="//dn-lbstatics.qbox.me/busuanzi/2.3/busuanzi.pure.mini.js"> |
3.7 修改文章底部的那个带#号的标签
修改文件themes/next/layout/_macro/post.swig,找到rel="tag">#,将#替换为<i class="fa fa-tag"></i>即可。
3.8 文章末尾效果
1)添加“本文结束”标记
效果图:

创建文件themes/next/layout/_macro/passage-end-tag.swig,填入一下内容
1 | {% if not is_index %} |
随后修改themes/next/layout/_macro/post.swig,在``之前添加
1 | {% if not is_index %} |
2)添加文末版权声明
效果如下
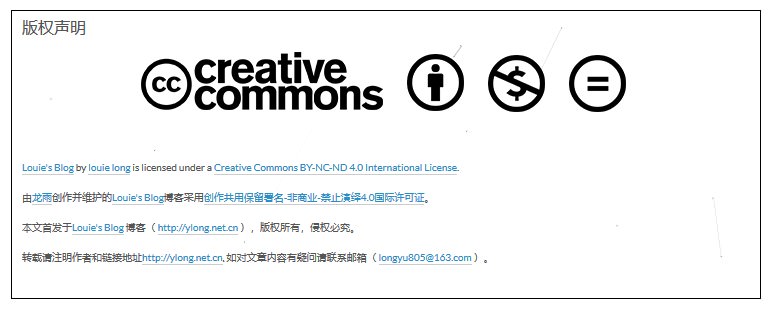
在themes/next/layout/_macro/生成一个custome-cc.swig文件,填入一下内容
1 | {% if not is_index %} |
需要在source/uploads下上传图片如下

同样修改themes/next/layout/_macro/post.swig,在post-footer之前添加
1 | <div> |
3.9 动态背景
next主题集成了集中动态背景效果,如下所示
1) canvas_nest
next 5.1.1以上可以直接在主题配置文件中将canvas_nest: false改成canvas_nest: true,随后下载动态背景js即可
参考链接:传送门
下载代码带主题的lib库中
1 | git clone https://github.com/theme-next/theme-next-canvas-nest themes/next/source/lib/canvas-nest |
随后使能canvas_nest即可,随后生成看效果,有几个参数可以自己修改themes/next/source/lib/canvas-nest/canvas-nest.min.js
| 参数 | 含义 |
|---|---|
| zIndex | 背景的z-index属性,css属性用于控制所在层的位置,默认:-1 |
| opacity | 线条透明度(0~1), 默认:0.5 |
| color | 线条颜色, 默认: ‘0,0,0’;三个数字分别为(R,G,B) |
| count | 线条的总数量, 默认: 99 |
2) 3-D 效果
参考链接:传送门
同样是下载相应的js脚本开启开关即可,非常简单
1 | git clone https://github.com/theme-next/theme-next-three themes/next/source/lib/three |
随后只需要开启单个效果开关
1 | # JavaScript 3D library. |
3.10 自定义样式修改
3.10.1 文章内链接样式
修改themes/next/source/css/_custom/custom.styl,在末尾添加如下css样式
1 | // 文章内链接文本样式 |
颜色可以自定义修改。
3.10.2 文章内``样式
修改themes/next/source/css/_custom/custom.styl,添加以下内容
1 | // Custom styles. |
3.10.3 主页文章添加阴影效果
修改themes/next/source/css/_custom/custom.styl,添加以下内容
1 | // 主页文章添加阴影效果 |
3.11 侧边栏社交小图标设置
打开主题配置文件themes/next/_config.yml,搜索Social,在图标库找自己喜欢的小图标,并将名字复制在||之后即可。
GitHub: https://github.com/louielong || github
3.12 顶部加载条特效
next的主题中已经预置的相关配置,仅仅只需要打开相应的开关并下载lib库即可,方法参见:pace特效传送门
克隆代码带主题的lib库中
1 | git clone https://github.com/theme-next/theme-next-pace themes/next/source/lib/pace |
随后修改themes/next/_config.yml,将pace: false改为pace: true,然后选择满意的特效选项即可。
pace_theme: pace-theme-flash
3.13 开启打赏功能
仅需要开启打赏功能并上传二维码即可
修改themes/next/_config.yml中的Reward字段下开启一个标签,并上传图二维码至source/uploads或者themes/next/source/images目录下,并相应的修改路径即可。
开启后发现打赏字体闪动很频繁碍眼,可以注释掉,themes/next/source/css/_common/components/post/post-reward.styl,如下注释掉或者修改 roll后的参数值,降低闪动频率。
1 | /* 注释文字闪动函数 |
3.14 添加RSS订阅
安装RSS订阅插件
1 | npm install --save hexo-generator-feed |
搜索rss字样,添加rss: /atom.xml,重新hexo g生成一遍即可。
3.15 添加SEO搜索
本来想添加SEO加速搜索的,但是登录到百毒上一看需要这么多信息,果断放弃了,顺带给一个鄙视的眼神。

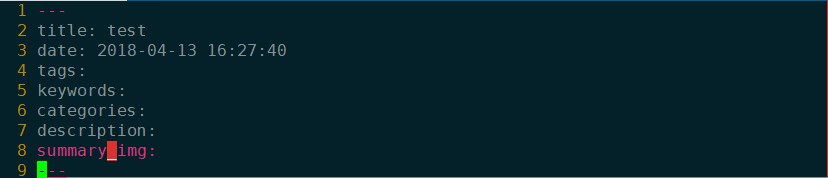
3.16 自定义默认生成文章头部模板
当新创建文章是希望可以默认生成一些头部字段,修改scaffolds/post.md文件增加一些自定义填充字段。
1 | --- |
使用hexo new test创建文章时则会自动填充相应信息,如下图所示
若想在主页显示文章的总结图片,在themes/next/layout/_macro/post.swig中的post.description前加入如下内容
1 | {% if post.summary_img %} |
重新生成博客即可看到文章缩略图。
3.17 博客字体修改
博客的字体配置在themes/next/_config.yml找到Font Settings,修改对应字段可以配置相应的字体效果。默认使用的是谷歌的字体。
如我想修改代码段的字体格式
1 | # Font settings for <code> and code blocks. |
3.18 显示网站副标题
Next的Mist主题默认隐藏了副标题的显示,通过修改themes/next/source/css/_schemes/Mist/_logo.styl可以打开副标题的显示。
1 | .site-subtitle { display: yes; } |
3.19 文章图片居中
修改Next主题文件themes/next/source/css/_schemes/Mist/_posts-expanded.styl,找到.posts-expand中的.post-body img加入auto字段。
1 | .post-body img { margin: 0, auto; } |
3.20 点击爱心效果
在themes/next/source/js/src下新建文件clicklove.js,随后将链接下的代码拷贝粘贴到clicklove.js文件中
在themes/next/layout/_layout.swig文件末尾添加:
1 | <!-- 页面点击小红心 --> |

3.21 博客背景图片
统一修改next预留的自定义文件themes/next/source/css/_custom/custom.styl
1)静态图片
1 | body { |
设置静态背景图片
2)动态图片
unsplash网站提供大量高清图片,可随机选择
1 | body { |
不透明度设定
1 | .main-inner { |
- background: #FFF 代表白色背景色
- opacity: 0.8 代表不透明度
3.22 侧边栏背景修改
给侧边栏添加背景图片,只需要修改themes/next/source/css/_common/components/sidebar/sidebar.styl的background的值即可,同时为了让图片平铺可以增加一些设置。同样的,图片可以是在线的也可以是本地。
1 | background: url('/uploads/sidebar.jpg'); |
【Note】
由于使用的黑色的背景,这里将侧边栏的字体设置为白色,需要修改一些配置文件
1)themes/next/source/css/_common/components/sidebar/sidebar-toc.styl的Line 23,此处影响的是文章目录字体颜色
1 | color: $whitesmoke; |
2)修改themes/next/source/css/_variables/base.styl的 line 265,此处影响的是站点概览的字体颜色
1 | $sidebar-nav-color = $whitesmoke |