KVM安装windows

1 前言

需要在window的系统上安装相应的软件,而当前的服务器都只安装了linux系统,由于服务器安装的linux都是server版本,因此只能在linux主机上通过KVM的方式安装window server 2008。本文记录一下在无桌面的ubuntu server下使用KVM安装windows server的过程。

环境说明:

linux主机:ubuntu server 16.04.4

windows:windows server 2008 R2

2 KVM安装windows

2.1 必要软件安装

本次安装的linux系统为ubuntu 16.04 server版本,首先通过apt命令安装必要的软件,服务器都是命令行,没有安装 X 桌面,所以加入 --no-install-recommends 参数,否则会安装 virt-viewer 之类的包,在它们的依赖关系中有 X11 和很多图形图像库,而这些都用不上。如果开启了桌面系统,那么可以不加该参数[1]。

1
louie@ubuntu:~$ sudo apt-get install -y --no-install-recommends qemu-kvm qemu-utils libvirt-bin virtinst cpu-checker

安装完成后验证一下

1
2
3
louie@ubuntu:~$ kvm-ok
INFO: /dev/kvm exists
KVM acceleration can be used

KVM安装完成后会自动生成一个virbr0 的桥接网络,但是这个是一个 NAT 的网络,没有办法跟局域网内的其他主机直接进行通信,因为安装的windows需要跟其他机器通信,因此需要将KVM的网桥和物理网卡桥接在一起。

配置/etc/network/interfaces文件,加入一下配置

1
2
3
4
5
6
7
8
9
10
11
12
13
14
15
# The bridged network interface
auto br0
iface br0 inet static
address 10.7.3.5
netmask 255.255.255.0
gateway 10.7.3.1
dns-nameservers 223.5.5.5
bridge_ports bond0
bridge_stop off
bridge_fd 0
bridge_maxwait 0
bridge_stp yes
iface br0 inet6 static
address 2402:6100::5/64
gateway 2402:6100::1

重启网络服务,通过brctl命令查看网桥状态

1
2
3
4
root@ubuntu:~# brctl show
bridge name bridge id STP enabled interfaces
br0 8000.d09466445091 yes bond0
virbr0 8000.5254006a9d3c yes virbr0-nic

随后开始创建虚拟机

2.2 准备虚拟硬盘文件

创建一个虚拟磁盘,根据需要控制磁盘大小,理论上20G就够用,这里设置稍大一些。

1
louie@ubuntu:~$ qemu-img create -f qcow2 WASU_AF.qcow2 50G

在启动虚拟机之前需要下载virtio驱动,因为kvm安装windows采用的是virtio的形式,主要是磁盘和网卡驱动,下载地址:传送门

这里安装的是64位系统,选择virtio-win-0.1.126_amd64.vfd的virtio驱动[2]

再准备一个windows server 的ISO镜像就齐活啦

一共需要的东西清单如下:

  • 虚拟磁盘文件(WASU_AF.qcow2)
  • virtio驱动(virtio-win-0.1.126_amd64.vfd)
  • windows server镜像(windows server 2008R2)

2.3 安装虚拟机

使用如下命令创建虚拟机,创建完成后需要在VNC上完成后续操作才算完全安装好

1
2
3
4
5
6
7
8
9
10
11
12
13
14
15
16
17
18
19
20
louie@ubuntu:~$ virt-install \
--name WASU_AF \
--memory 4096 \
--vcpus sockets=2,cores=2,threads=2 \
--cdrom=/opt/cfiec/6dnskvm/windows_ser_2008.iso \
--os-type=windows \
--os-variant=auto \
--disk /opt/cfiec/6dnskvm/WASU_AF.qcow2,bus=virtio,size=50 \
--disk /opt/cfiec/6dnskvm/virtio-win-0.1.126_amd64.vfd,device=floppy \
--network bridge=br0,model=virtio \
--graphics vnc,password=v6dns,listen=::,port=5910 \
--hvm \
--virt-type kvm

WARNING Graphics requested but DISPLAY is not set. Not running virt-viewer.
WARNING No console to launch for the guest, defaulting to --wait -1

Starting install...
Creating domain... | 0 B 00:00:01
Domain installation still in progress. Waiting for installation to complete.

【Note】

1)分配给虚拟机的vCPU个数由sockets、cores、threads三个参数的乘积来控制,sockets指代CPU插槽数目,cores指代每个插槽芯片的核心数,threads指代那个核心的超线程,如上所示创建的虚拟机共有8个逻辑cpu。

2)listen指代的是虚拟机的VNC监听接口,默认是localhost,0:0:0:0指带所有的IPv4接口,::指代所有接口,包括IPv4和IPv6。

随后需要通过VNC来继续完成系统的安装

1
vnc://[2402:6100::5]:5910

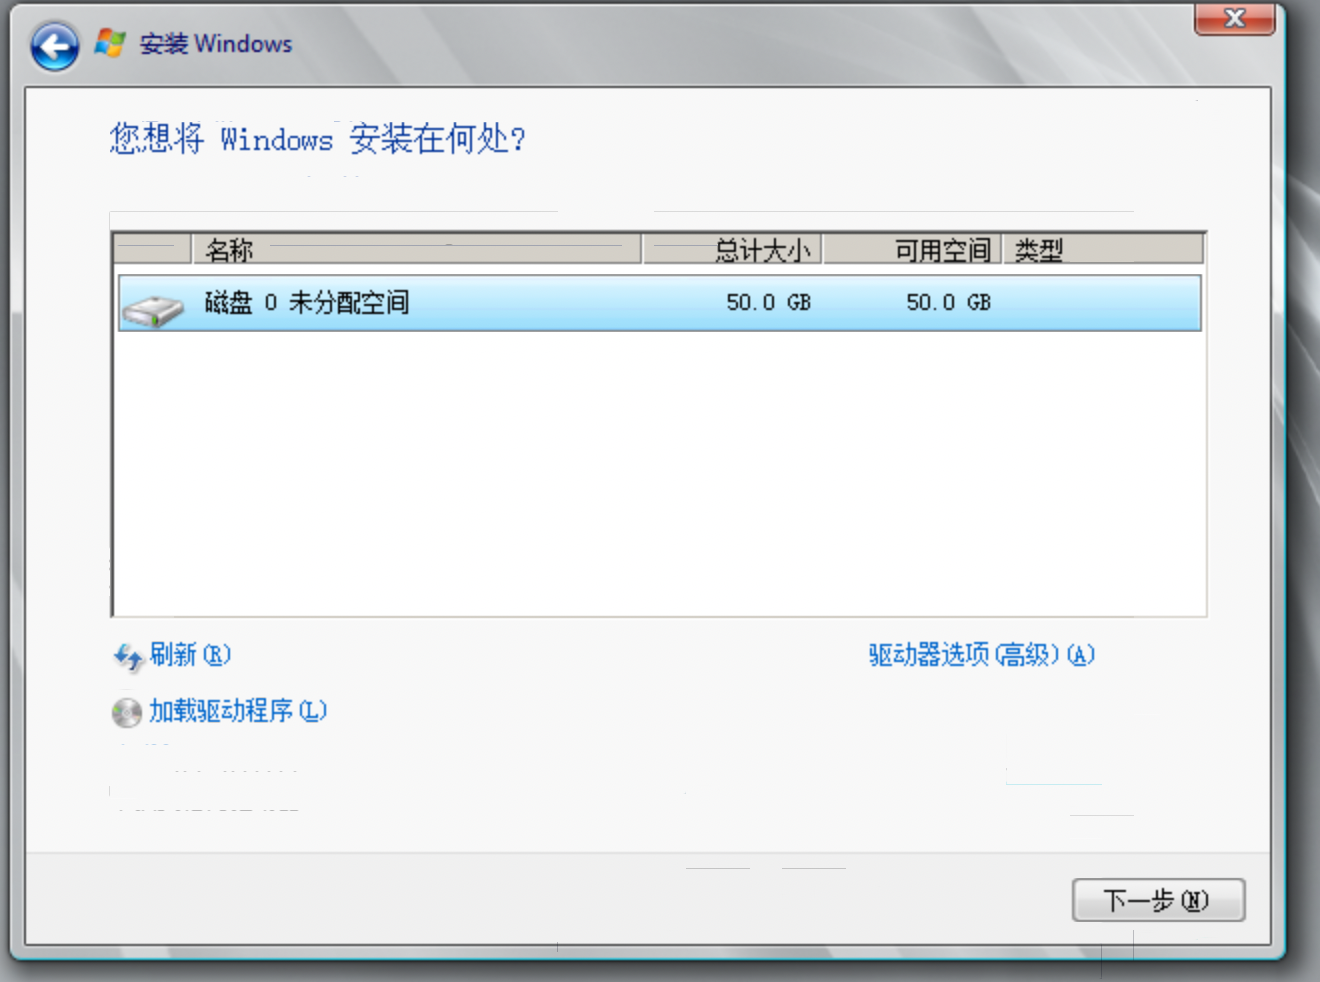
输入密码后即可进入windows server安装界面,安装过程会出现看不见磁盘的情况,是因为没有加载virtio驱动的原因,这时候就轮到virtio-win-0.1.126_amd64.vfd起作用啦,virtio驱动是以软盘的形式加载的,这样可以避免虚拟机启动时找不到系统盘镜像。

windows server 2008 安装1

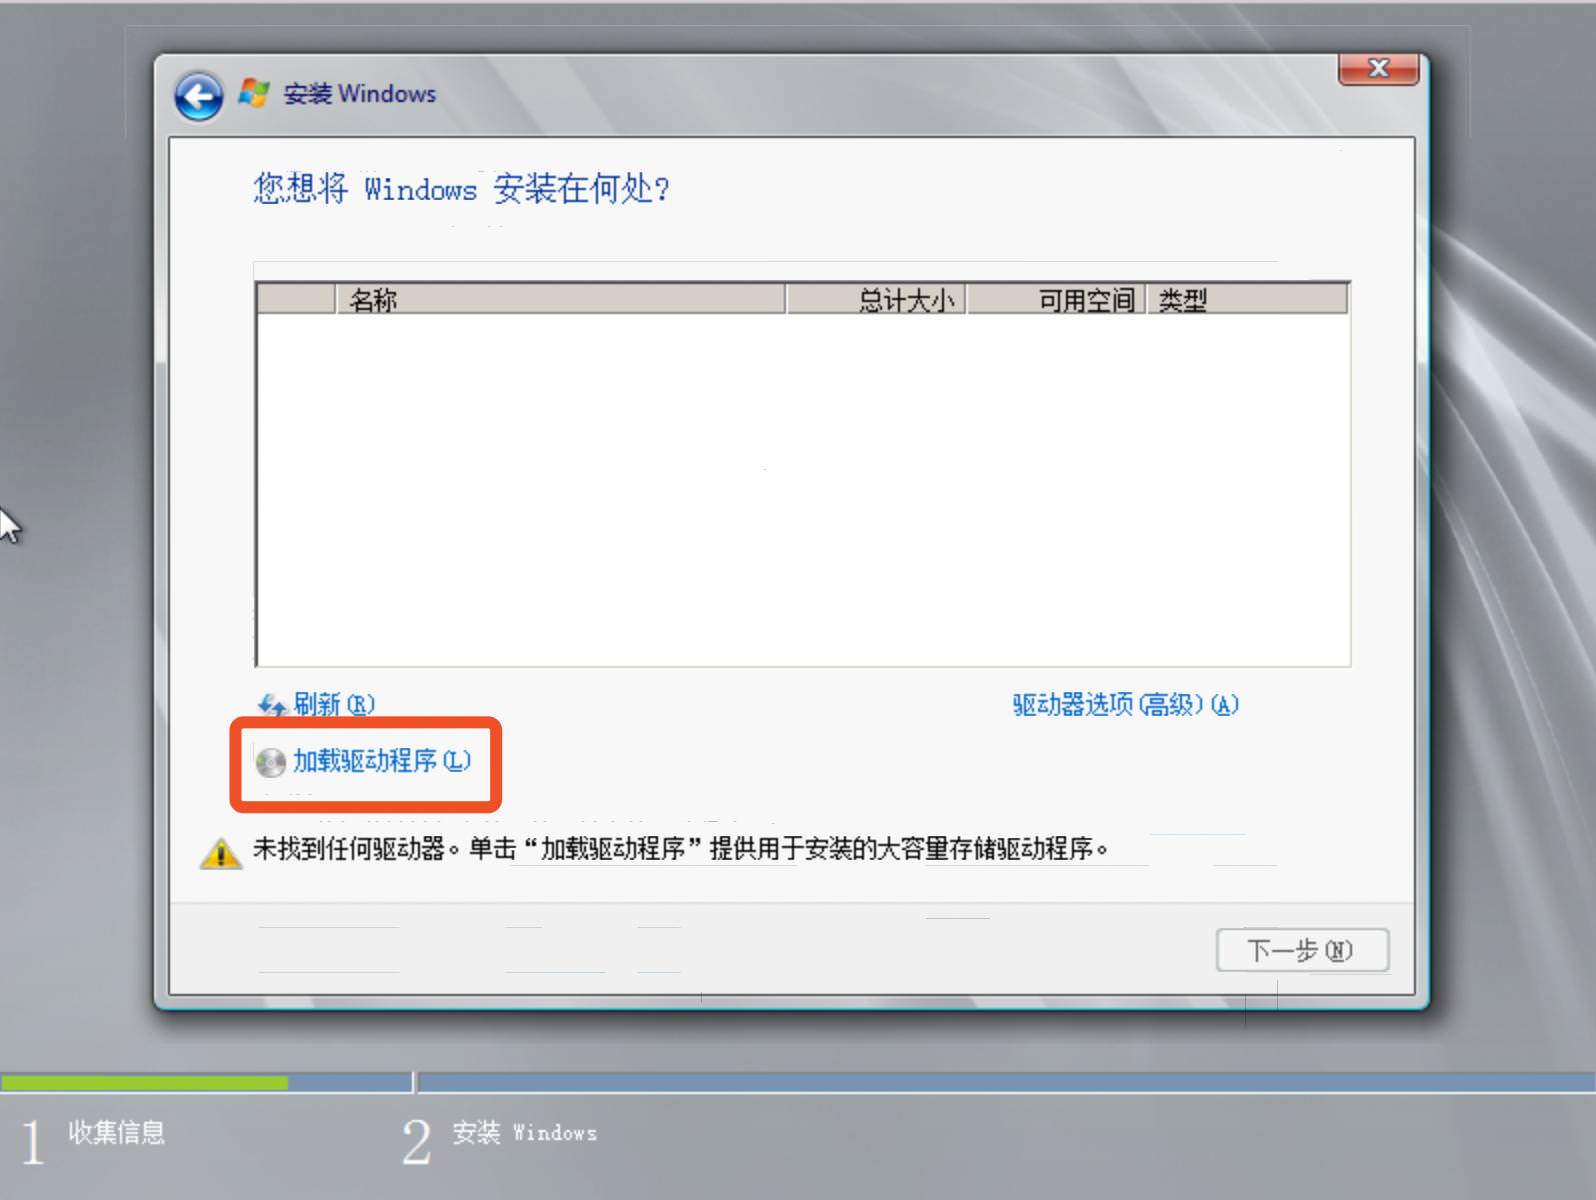
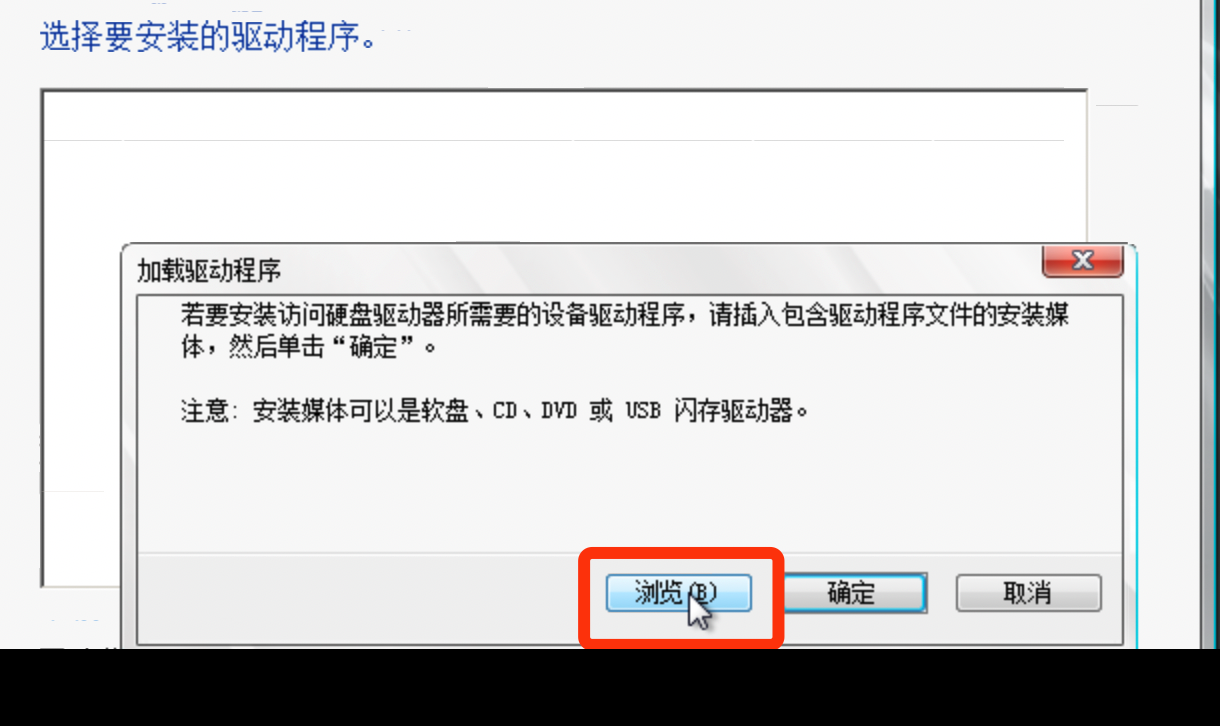
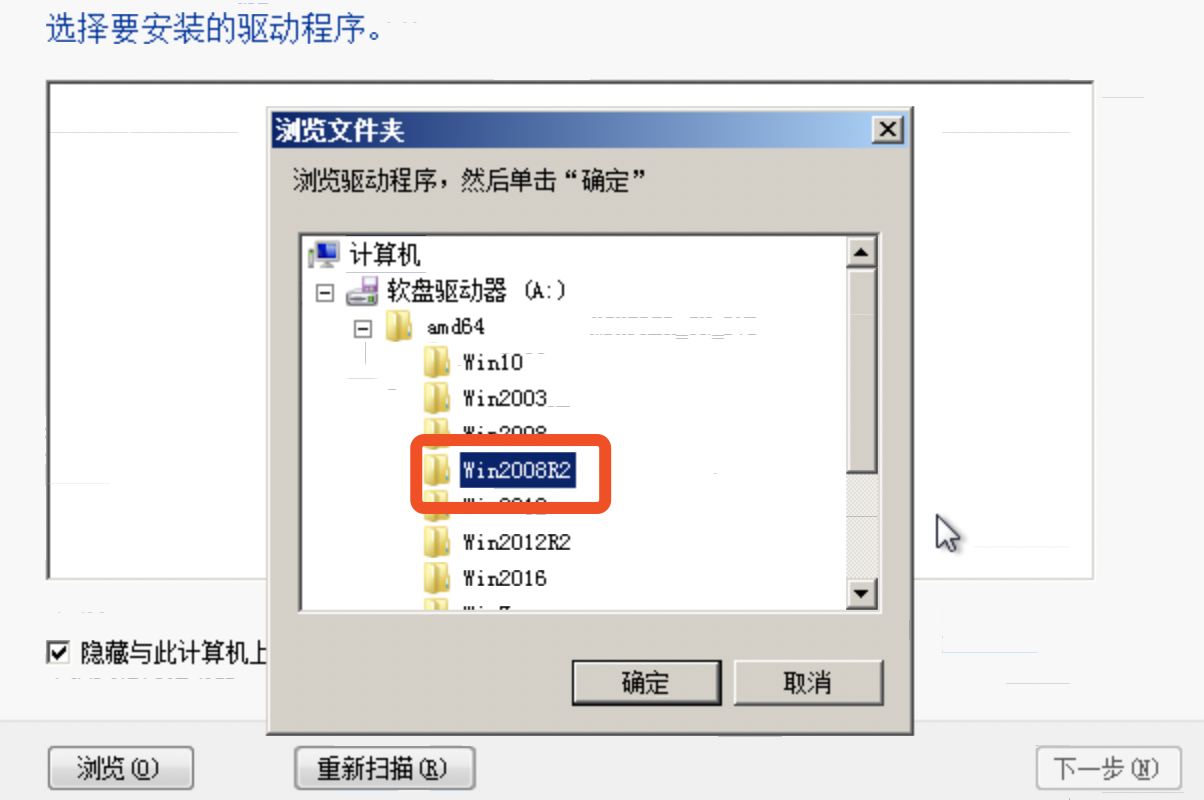
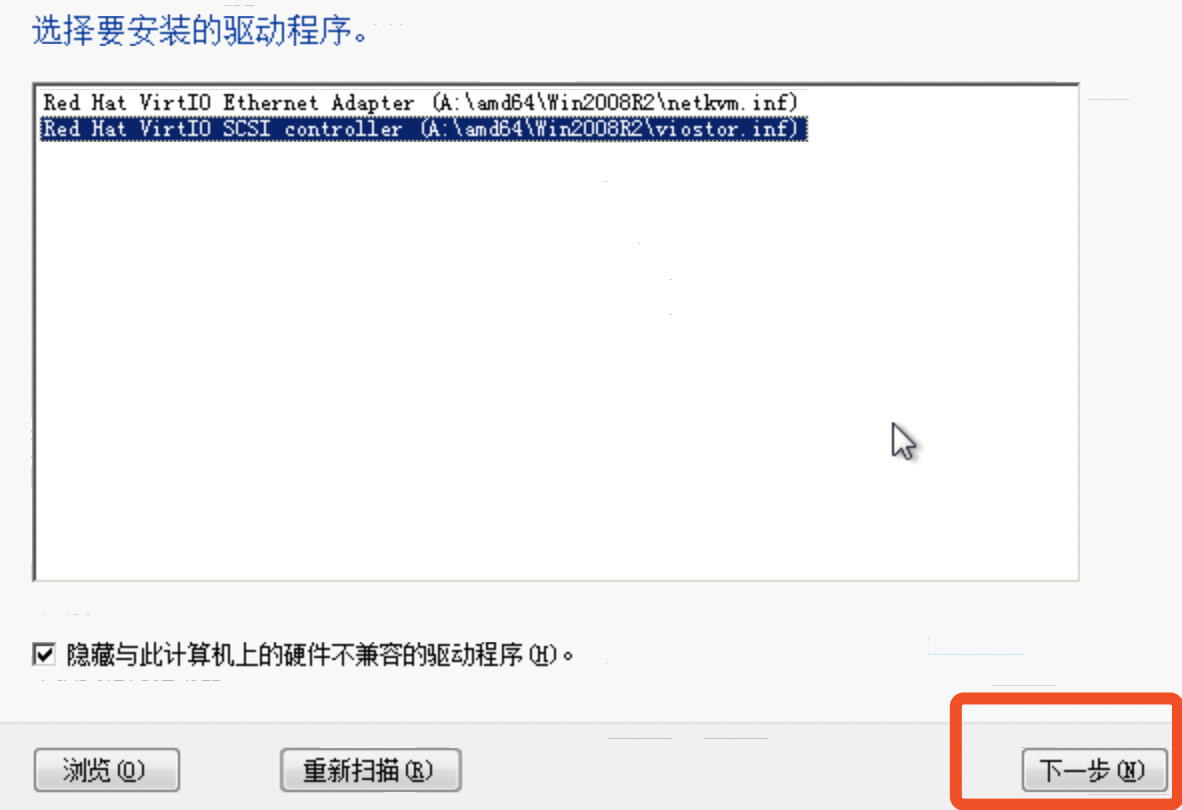
选择“加载驱动”,“浏览”,找到“软盘驱动器”,点开后选择 “server 2008R2”确定,会发现有两个驱动,一个是Ethernet网卡,一个SCSI磁盘,操作两次驱动加载完成后,磁盘就出现了,继续安装即可。

windows server 2008 安装2

windows server 2008 安装3

windows server 2008 安装4

windows server 2008 安装5

等待安装完成,创建新密码即安装完成。

windows server 2008 安装6

在ubuntu上使用virsh命令即可查看虚拟机状态,进行虚拟机的关机、暂停操作等。

2.4 虚拟机开关机

在完成上述的安装过程后,即可通过lib-virt的virsh来完成虚拟机生命周期管理了,包括:开机、关机、暂停、删除等操作。

在ubuntu server上查看虚拟机运行状态

1
2
3
4
louie@ubuntu:~$ virsh list
Id Name State
----------------------------------------------------
3 DELL_STORAGE running

关机

1
sudo virsh shutdown DELL_STORAGE

开机

1
sudo virsh start DELL_STORAGE

暂停(挂起)

1
sudo virsh suspend DELL_STORAGE

删除

1
sudo virsh destroy DELL_STORAGE

要想彻底删除一个虚拟机需要将其xml文件一并删除,即删除/etc/libvirt/qemu/下的同名xml文件,同时重启libvirt服务,sudo service libvirt-bin restart

需要修改虚拟机的硬件配置需要修改虚拟机的配置文件,位于/etc/libvirt/qemu/目录下有一个同名的xml文件,但是不要直接修改它,使用如下命令进行编辑(编辑前先将虚拟机关机),首次编辑需要选择编辑器,这里选择vim

1
2
3
4
5
6
7
8
9
10
11
louie@ubuntu:~$ sudo virsh shutdown DELL_STORAGE
louie@ubuntu:~$ sudo virsh edit DELL_STORAGE
[sudo] password for louie:

Select an editor. To change later, run 'select-editor'.
1. /bin/ed
2. /bin/nano <---- easiest
3. /usr/bin/vim.basic
4. /usr/bin/vim.tiny

Choose 1-4 [2]: 3

如我们需要将软盘和系统镜像卸载掉,删除以下内容

1
2
3
4
5
6
7
8
9
10
11
12
13
<disk type='file' device='floppy'>
<driver name='qemu' type='raw'/>
<source file='/opt/cfiec/6dnskvm/virtio-win-0.1.126_amd64.vfd'/>
<target dev='fda' bus='fdc'/>
<address type='drive' controller='0' bus='0' target='0' unit='0'/>
</disk>
<disk type='file' device='cdrom'>
<driver name='qemu' type='raw'/>
<source file='/opt/cfiec/6dnskvm/windows_ser_2008.iso'/>
<target dev='hda' bus='ide'/>
<readonly/>
<address type='drive' controller='0' bus='0' target='0' unit='0'/>
</disk>

关于文件的其他内容含义可以部分解释如下[3]

1
2
3
4
5
6
7
8
9
10
11
12
13
14
15
16
17
18
19
20
21
22
23
24
25
26
27
28
29
30
31
32
33
34
35
36
37
38
39
40
41
42
43
44
45
46
47
48
49
50
51
52
53
54
55
56
57
58
59
60
61
62
63
64
65
66
67
68
69
70
71
72
73
74
75
76
77
78
79
80
81
82
83
84
85
86
87
88
89
90
<domain type='kvm'>   //虚拟机类型,如果是Xen,则type=‘xen’
<name>DELL_STORAGE </name> //虚拟机名称,同一物理机唯一
<uuid>d29c0f61-8501-420a-a006-d82a00fe7eb4</uuid> //同一物理机唯一,可用uuidgen生成
<memory unit='KiB'>4194304</memory> //虚拟机内存
<currentMemory unit='KiB'>4194304</currentMemory>
<vcpu placement='static'>4</vcpu> // 虚拟机vCPU个数
<os>
<type arch='x86_64' machine='pc-i440fx-xenial'>hvm</type> //arch指出系统架构类型,machine 则是机器类型,查看机器类型:qemu-system-x86_64 -M ?
<boot dev='hd'/> // 启动介质,这里是安装好的系统因此选择hd,
</os>
<features>
<acpi/>
<apic/>
<hyperv>
<relaxed state='on'/>
<vapic state='on'/>
<spinlocks state='on' retries='8191'/>
</hyperv>
</features>
<cpu>
<topology sockets='1' cores='2' threads='2'/> //vCPU 逻辑核心
</cpu>
<clock offset='localtime'> //虚拟机时钟
<timer name='rtc' tickpolicy='catchup'/>
<timer name='pit' tickpolicy='delay'/>
<timer name='hpet' present='no'/>
<timer name='hypervclock' present='yes'/>
</clock>
<on_poweroff>destroy</on_poweroff>
<on_reboot>restart</on_reboot>
<on_crash>restart</on_crash>
<pm>
<suspend-to-mem enabled='no'/>
<suspend-to-disk enabled='no'/>
</pm>
<devices>
<emulator>/usr/bin/kvm-spice</emulator>
<disk type='file' device='disk'> //虚拟机虚拟磁盘
<driver name='qemu' type='qcow2'/>
<source file='/opt/cfiec/6dnskvm/DELL_STORAGE .qcow2'/>
<target dev='vda' bus='virtio'/>
<address type='pci' domain='0x0000' bus='0x00' slot='0x04' function='0x0'/>
</disk>
<controller type='usb' index='0' model='ich9-ehci1'>
<address type='pci' domain='0x0000' bus='0x00' slot='0x05' function='0x7'/>
</controller>
<controller type='usb' index='0' model='ich9-uhci1'>
<master startport='0'/>
<address type='pci' domain='0x0000' bus='0x00' slot='0x05' function='0x0' multifunction='on'/>
</controller>
<controller type='usb' index='0' model='ich9-uhci2'>
<master startport='2'/>
<address type='pci' domain='0x0000' bus='0x00' slot='0x05' function='0x1'/>
</controller>
<controller type='usb' index='0' model='ich9-uhci3'>
<master startport='4'/>
<address type='pci' domain='0x0000' bus='0x00' slot='0x05' function='0x2'/>
</controller>
<controller type='pci' index='0' model='pci-root'/>
<controller type='fdc' index='0'/>
<controller type='ide' index='0'>
<address type='pci' domain='0x0000' bus='0x00' slot='0x01' function='0x1'/>
</controller>
<interface type='bridge'> // 网卡类型,桥接
<mac address='52:54:00:90:34:70'/>
<source bridge='br0'/> //桥接网桥名称
<model type='virtio'/> // 网卡驱动类型
<address type='pci' domain='0x0000' bus='0x00' slot='0x03' function='0x0'/>
</interface>
<serial type='pty'>
<target port='0'/>
</serial>
<console type='pty'>
<target type='serial' port='0'/>
</console>
<input type='tablet' bus='usb'/>
<input type='mouse' bus='ps2'/>
<input type='keyboard' bus='ps2'/>
<graphics type='vnc' port='5911' autoport='no' listen='::' passwd='v6dns'> // VNC监听
<listen type='address' address='::'/>
</graphics>
<video>
<model type='vga' vram='16384' heads='1'/>
<address type='pci' domain='0x0000' bus='0x00' slot='0x02' function='0x0'/>
</video>
<memballoon model='virtio'>
<address type='pci' domain='0x0000' bus='0x00' slot='0x06' function='0x0'/>
</memballoon>
</devices>
</domain>

更多相关xml标签内容含义查看官方文档:传送门,或者man手册man virsh

2.5 虚拟机的迁移

当需要迁移虚拟机时,可以直接将虚拟机磁盘.img和虚拟机配置文件.xml拷贝至其他服务器。

.xml放置在/etc/libvirt/qemu目录下,虚拟磁盘放置在同样的路径或者修改.xml中磁盘路径,随后导入虚拟机

1
sudo virsh define <VM>.xml

通过virsh listvirsh list --all查看虚拟机,若虚拟机未启动在通过virsh start <VM>启动虚拟机即可。

2.6 虚拟机磁盘添加

当虚拟机磁盘不够用时,需要为虚拟机新增磁盘,首先创建磁盘[4]

1
root@ubuntu:~# qemu-img create -f raw /opt/cfiec/6dnskvm/data/WASU_AF_DAT.img 2T

添加磁盘方式有两种,临时添加和永久添加

1)临时添加

1
root@ubuntu:~# virsh attach-disk WASU_AF /opt/cfiec/6dnskvm/data/WASU_AF_DATA.qcow2 vdb --cache none

这种方式添加后重启虚拟机就会丢失

2)永久添加

需要修改虚拟机的xml配置文件

1
root@ubuntu:~# virsh edit WASU_AF

disk字段后添加如下内容

1
2
3
4
5
6
7
8
9
10
11
12
13
14
15
#找到硬盘配置(原来的系统硬盘)
<disk type='file' device='disk'>
<driver name='qemu' type='raw'/>
<source file='/disk/sdb1/c1.img'/>
<target dev='vda' bus='virtio'/>
<address type='pci' domain='0x0000' bus='0x00' slot='0x04' function='0x0'/>
</disk>

#增加文件硬盘,vdb
<disk type='file' device='disk'>
<driver name='qemu' type='raw' cache='none'/>
<source file='/disk/sdb6/c1d6.img'/>
<target dev='vdb' bus='virtio'/>
<address type='pci' domain='0x0000' bus='0x00' slot='0x06' function='0x0'/>
</disk>

注意:两个磁盘的slot数值不能重复。

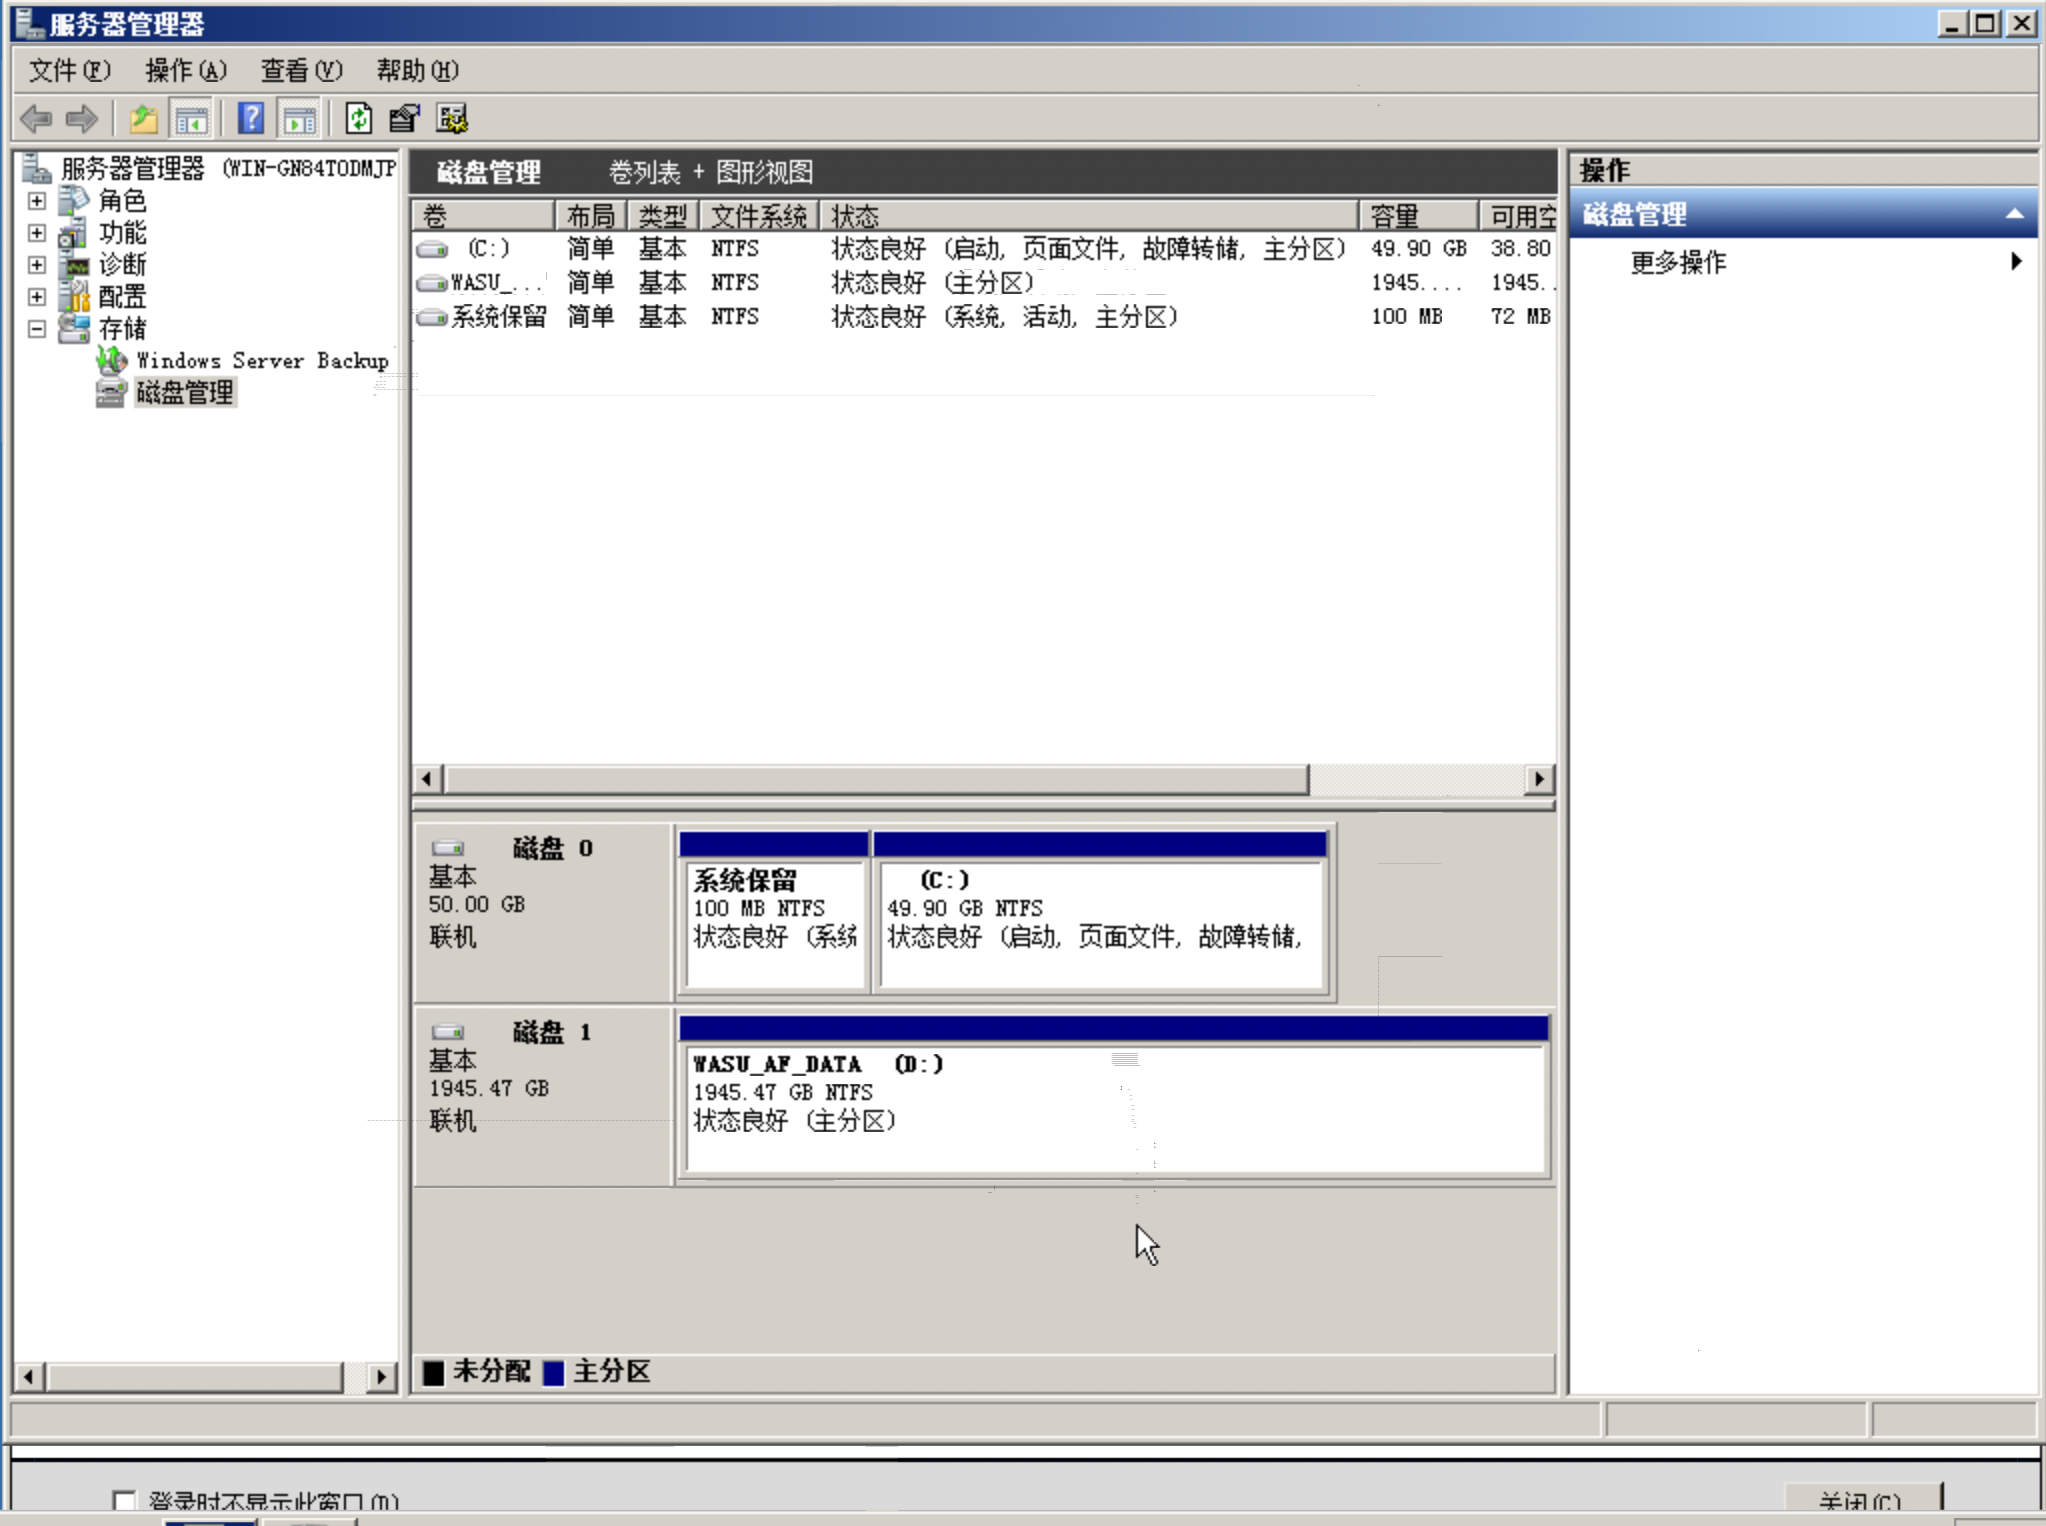
添加后即可在虚拟机里查看磁盘,进入到设备管理器—>磁盘管理,可以看到磁盘,本次分配的磁盘为2T,容量较大,在选择磁盘引导时选用GPT引导,随后选中磁盘进行格式化
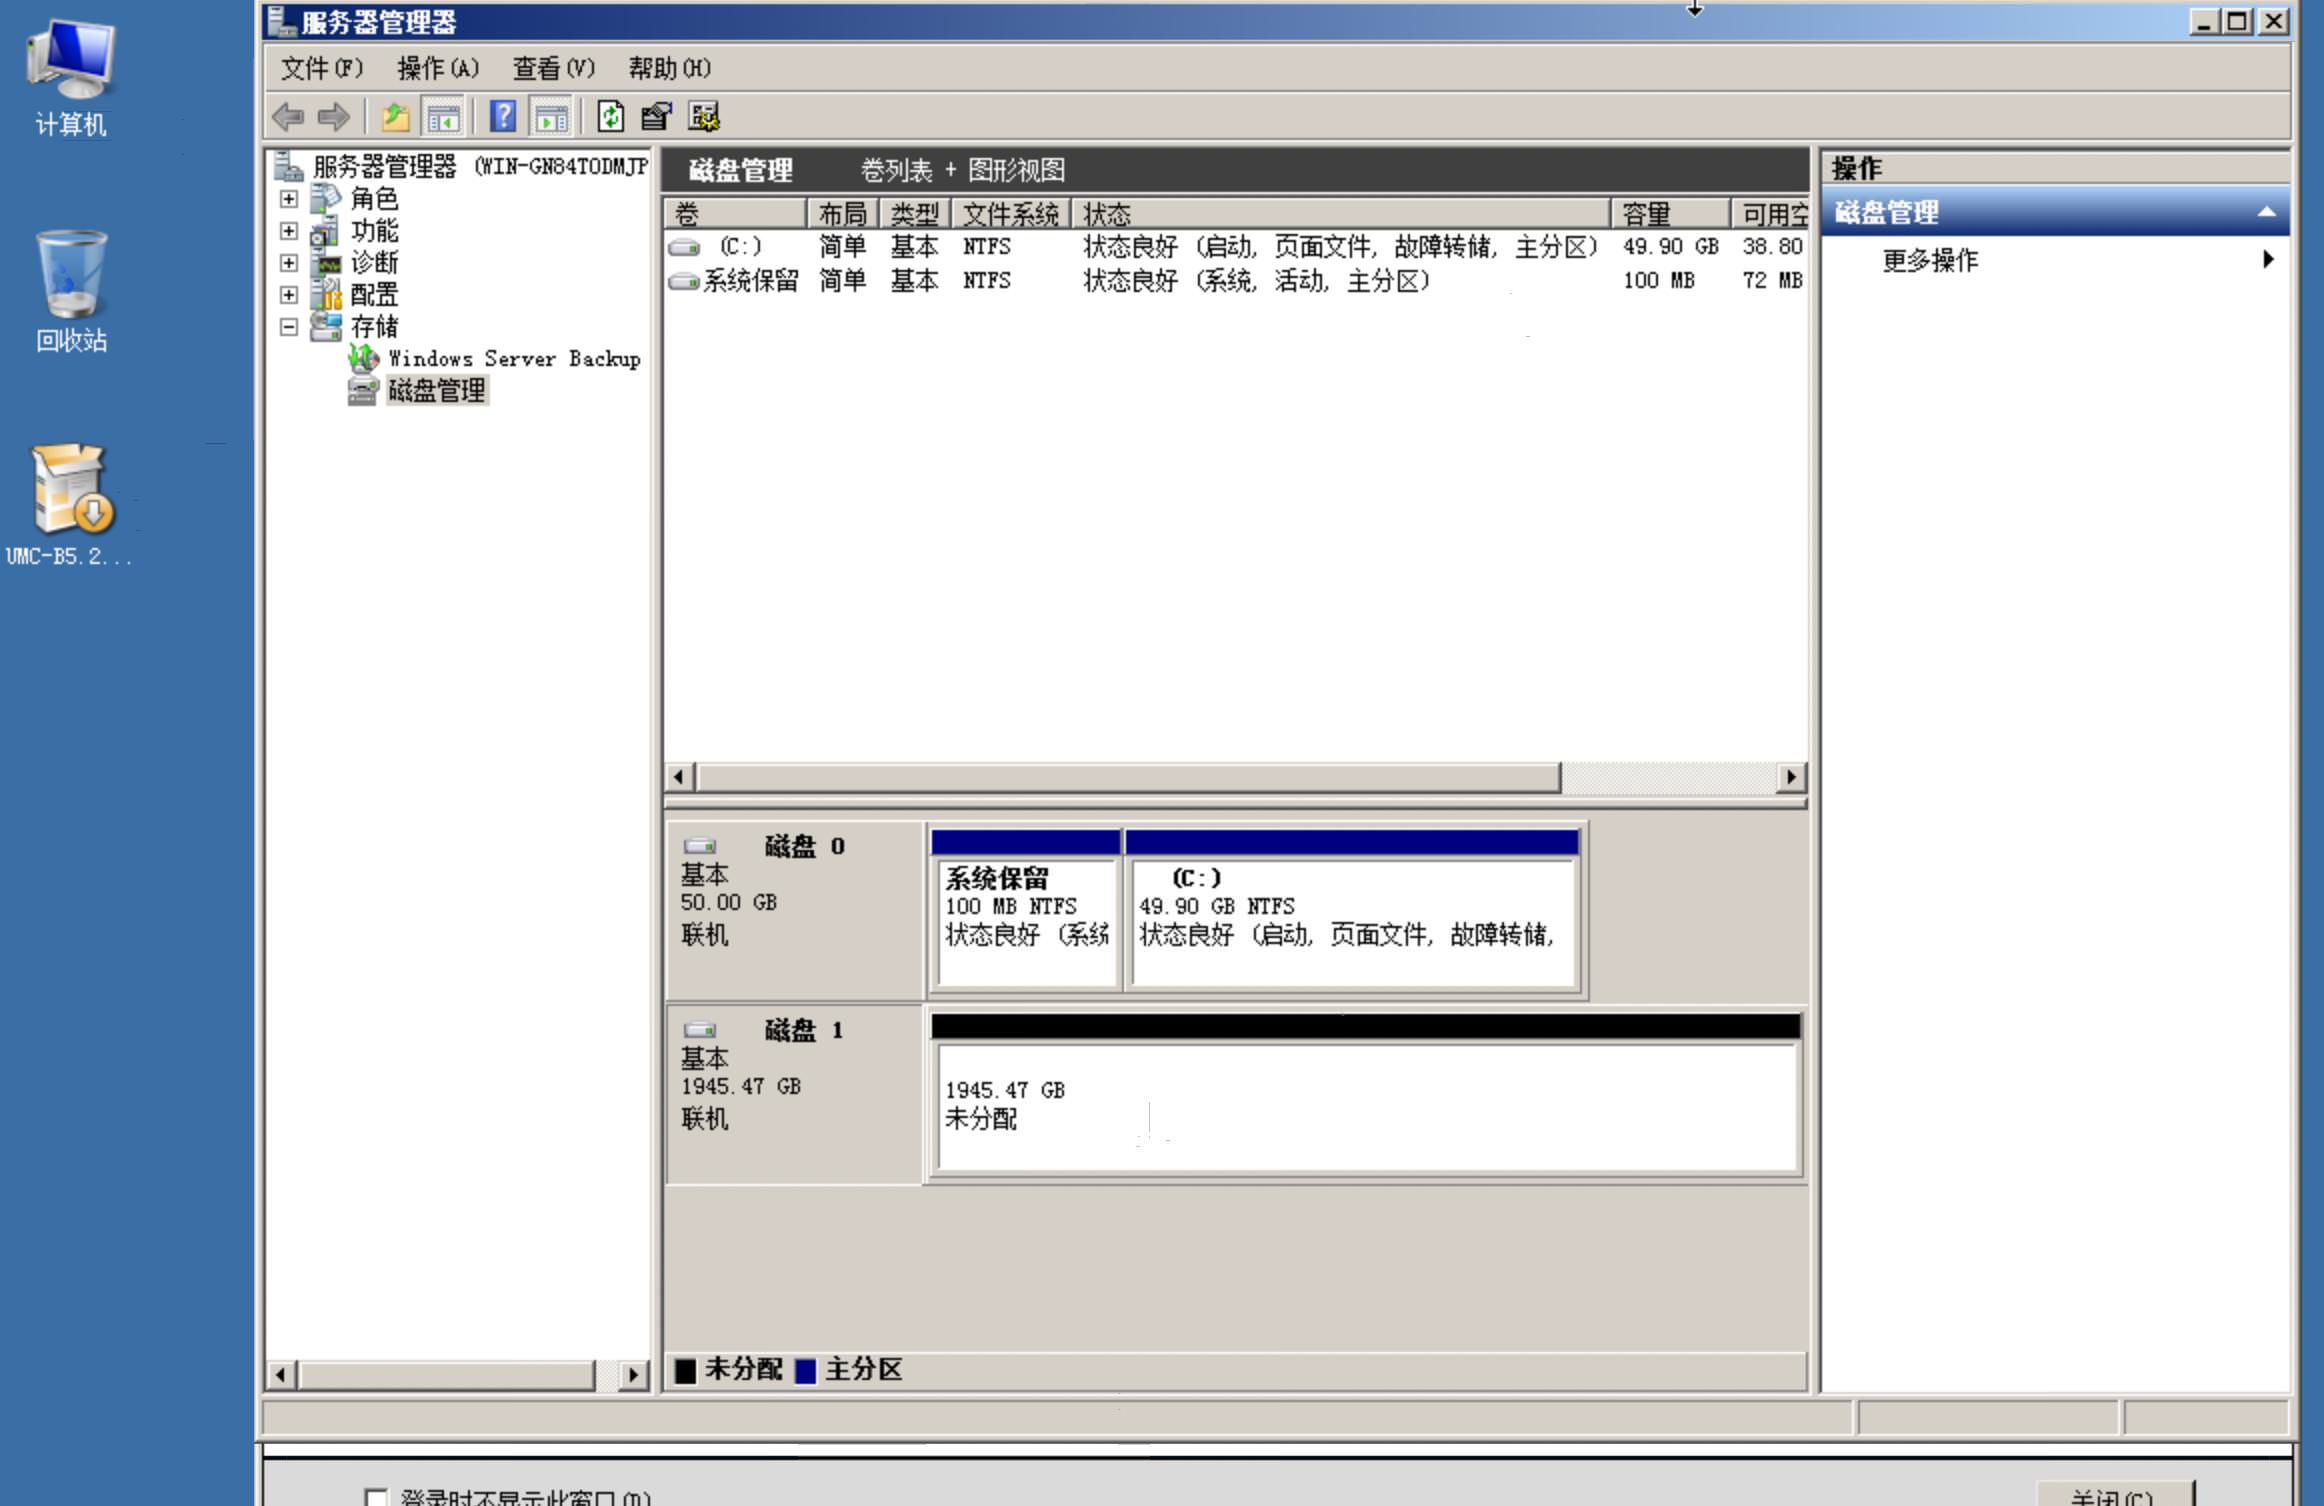
windows server 2008 安装9

格式化之后磁盘就可以直接使用了

windows server 2008 安装10

3 windows server 2008 设置

3.1 在桌面显示我的电脑

点击左下角的开始,在搜索框中输入tubiao,选择显示或隐藏桌面上的通用图标,选择想要添加的图标即可
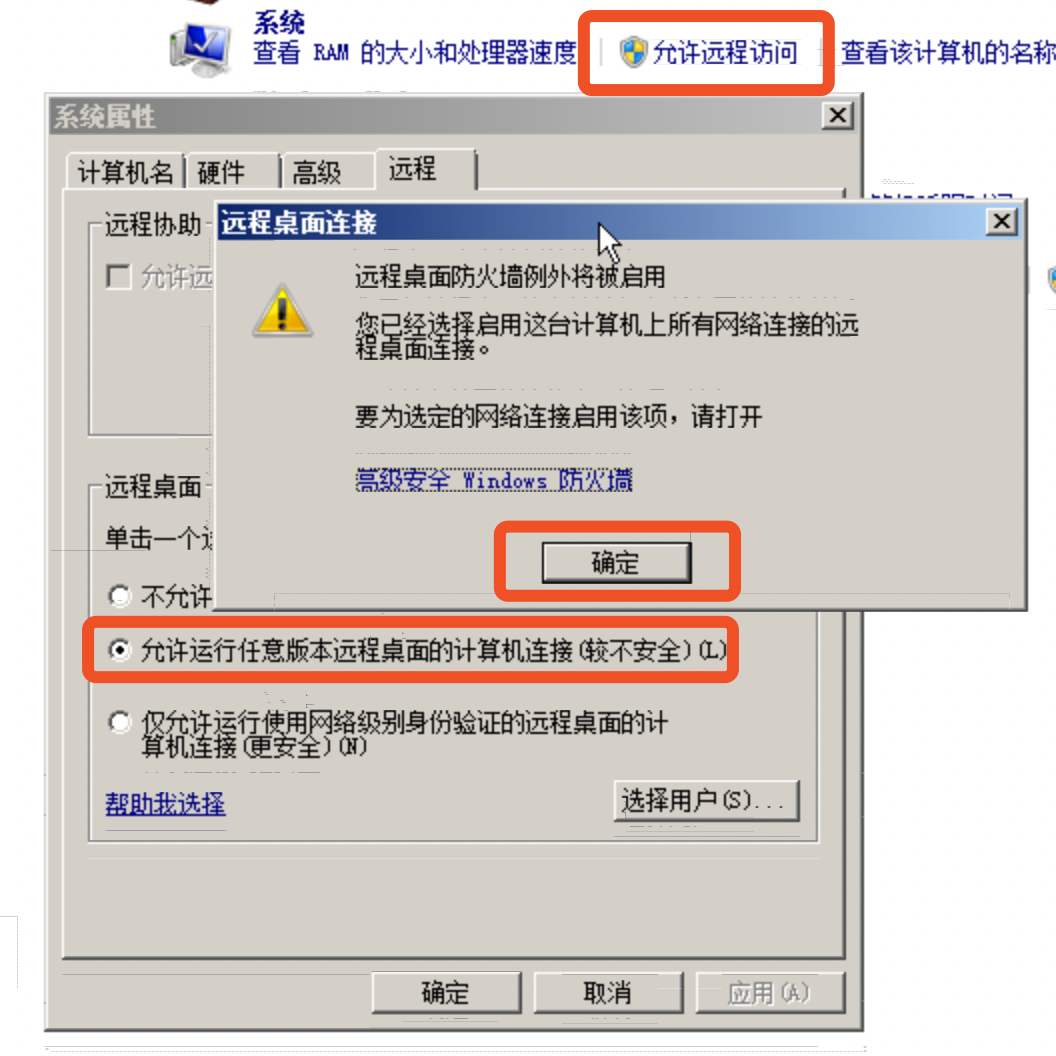
windows server 2008 安装7

3.2 开启远程桌面

点击左下角的开始,选择右边的控制面板,选择系统和安全,点击系统中的允许远程访问,选择允许允许....点击确定,随后点击应用即可通过windows的远程桌面来访问。

windows 2008 安装8

【参考资料】

1)kvm安装虚拟机

2)KVM安装windows server 2008

3)KVM安装windows虚拟

4)KVM虚拟机磁盘扩容

-------------本文结束感谢您的阅读-------------

版权声明

Louie's Blog by louie long is licensed under a Creative Commons BY-NC-ND 4.0 International License.
Louie Long创作并维护的Louie's Blog博客采用创作共用保留署名-非商业-禁止演绎4.0国际许可证
本文首发于Louie's Blog 博客( http://ylong.net.cn ),版权所有,侵权必究。
转载请注明作者和链接地址http://ylong.net.cn, 如对文章内容有疑问请联系邮箱( longyu805@163.com )。